Hatching Brine Shrimp Consistently and Made Easy
© Alan S. Bias
Permission granted for nonprofit reproduction or duplication of photos and text with proper credit for learning purposes only.
I'm not sure about you, but I just don't care to raise most live foods? I'd bet your spouse thinks even less of the idea. Like most breeders, over the years, I've tried numerous numerous types of feeds from vinegar eels to micro worms. Three things are for sure more often than not: they take up quite a bit of space to culture v. what is produced, there's not enough to go around most days and they smell bad when gone sour. With a few tanks of sparsely populated killifish or wild-type livebearers it may be justified. In a moderate sized guppy breeding program with heavily packed tanks, it's really just not worth it.
 New research seems to support what many of us have known for years. Outside of fresh earthworms, nothing beats the benefits of newly hatched Baby Brine Shrimp (BBS) for promoting fertility, grow, vigor and health. Factor in ease and consistency in an indoor setting and and the choice should be obvious.
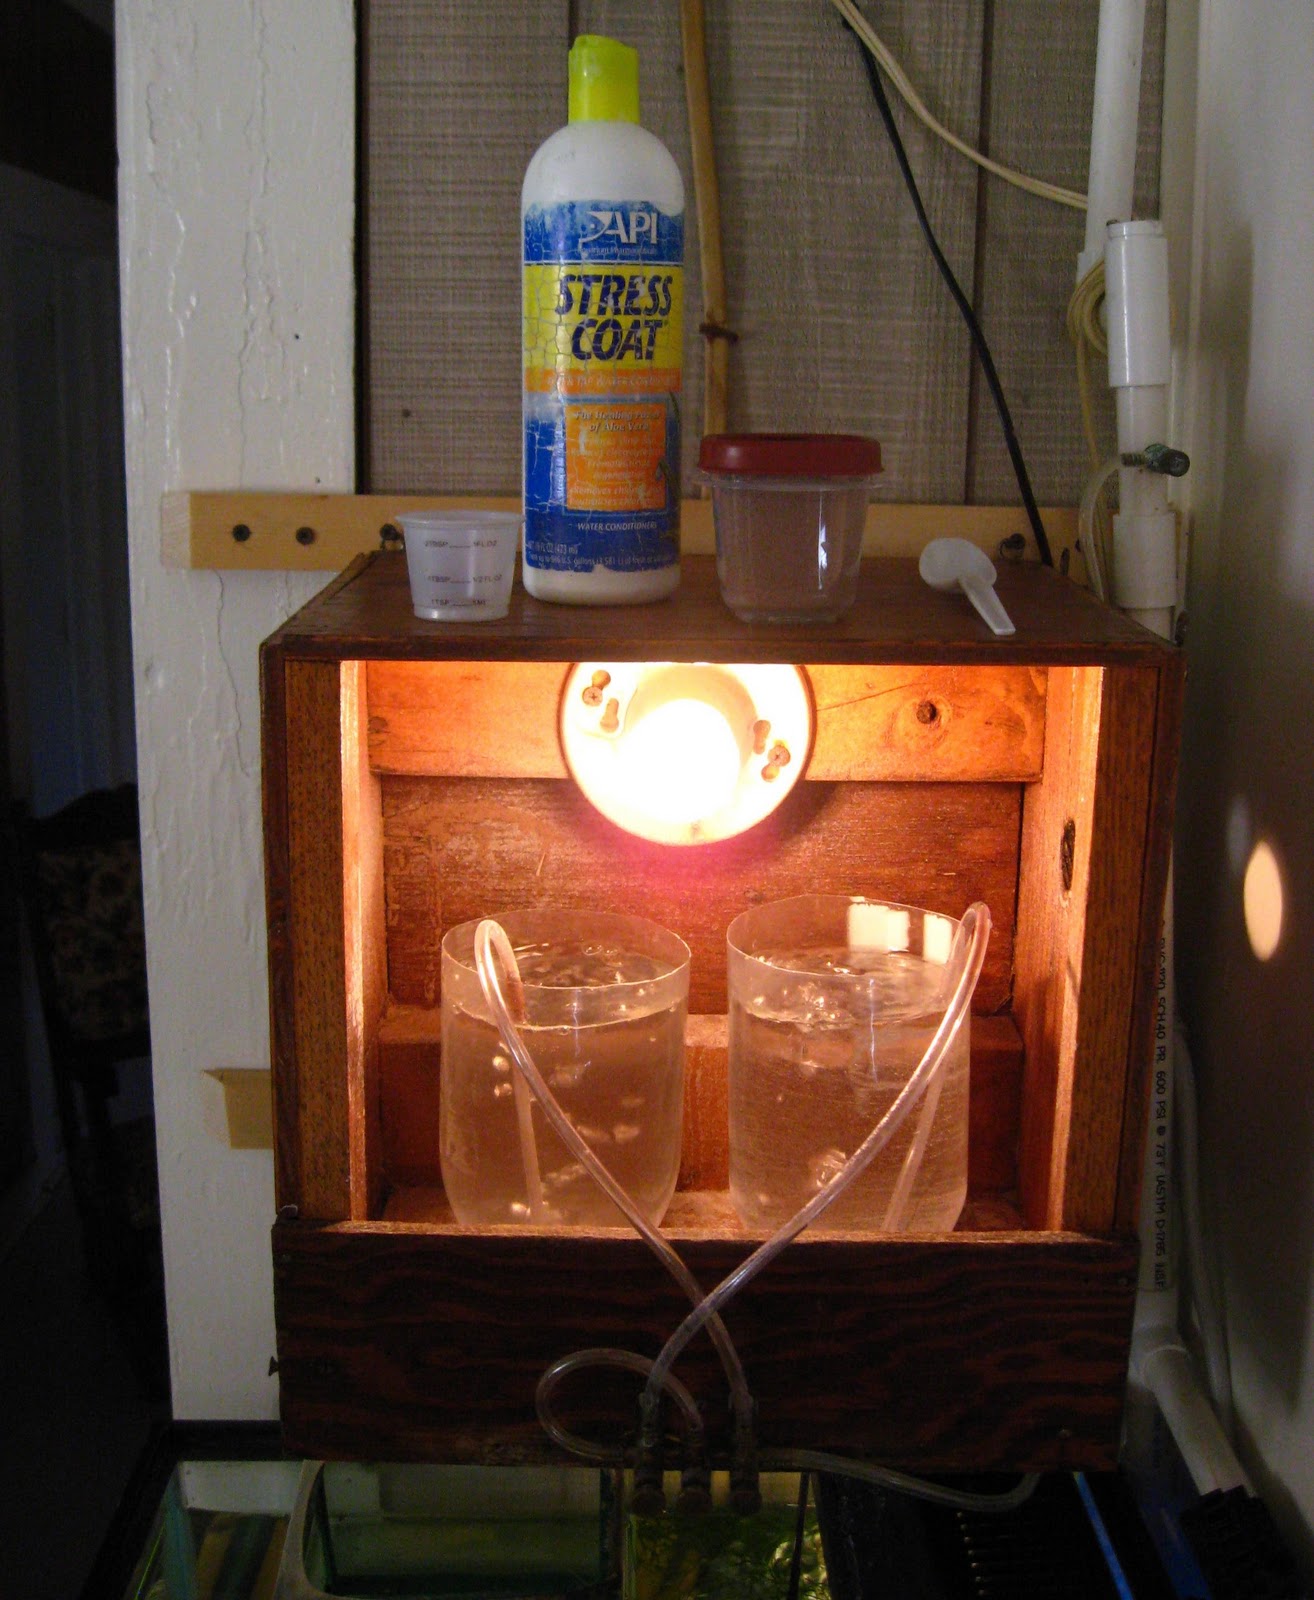
 Now the the first thing some of you will say to yourself is "ease & consistency?" Yes, it is easy to raise BBS, and yes it can be done so with consistency. The trick? For the Artemia provide a similar environment in which they evolved with high temperature & PH. For the breeder - a simple solution in ease and maintenance. In the photo you will see my hatching station. It consists of a well lit, homemade box set up for two simultaneous batches.
Consistency for me comes from hatching in clean bottles, good eggs, high even temperature and even air flow. The number one reason breeder have poor hatches? They don't buy good eggs from a reliable source and then freeze them to keep out humidity. You should have near 100% hatches every day and so few unhatched eggs as to be unnoticeable.
Living in limestone Karst country my water comes out of the tap at a PH of 8.0 - 8.2, KH of < 17.9ppm and DH over 200ppm. Just right for hatching BBS. Even so, I add a shot of Stress Coat at the start of each hatch - little Aloe Vera never seems to hurt. Some breeders like to add a drop of bleach if their water is naturally soft & acidic.
A 40 watt utility bulb provides both ample light and a stable heat source of 86-88* within the station. Hatchery's are inverted 1 liter pop bottles. With the bottom of the bottles removed they still hold about 2/3 of liter of water. Fill your bottles with cold water just prior to setting up a hatch. Doesn't seem to increase hatch time and reduces slimy buildup. Too this I add 3-4 teaspoons of non-iodized table salt using a little measuring cup from a Pepto bottle or similar. It's quicker than a spoon and spills less. Why table salt? It's cheap, 2 pounds for under a dollar. Add one heaping teaspoon of Grade A eggs rated for a 90% hatch rate. Your hatch is ready to pull in 16-18 hours.
Now here's where the best part of my setup comes into play. When you are ready to harvest turn of the air supply and let the BBS settle. They quickly use up all the available oxygen and settle to the bottom in 15-20 minutes depending on size of hatch. A good brine shrimp net with thick mesh has not been produced in many years, so discard them. I have not used brine shrimp nets for many years. How? Replace the normal bottle tops with one that slides open. After the shrimp have settled simply hold a small container of choice under the nozzle and open.


I feed with a standard baster and store excess in the refrigerator. From a single hatch I can feed more than amply a 40-60 tank room 2-3 times. This being dependent on how many tanks of fry & youngsters are on hand. Rarely does the need for more than one hatchery going on any given day exist.
~~ In Summary, here is why this design works for me ~~
* Excess salt spray is contained within the hatching station.
* Entire station is easily wiped down or taken outside and rinsed if need.
* Light and heat come from a single, standard 40 watt utility bulb.
* Box & light keep water at 86-88* degrees year round with no fluctuations.
* Air is controlled by brass valves mounted in front of the box.
* Hatches are cultured in one liter plastic pop bottles with the bottom cut off.
* Air is fed from the top through standard airline tubing & a section of rigid tube.
* Top fed air allows for easy removal & cleaning of hatchery.
* Bottles are self supporting, they sit in holes cut in the base of the station.
* To clean simply lift out after each use, no base to disconnect bottle from.
* No large / odd shaped container to clean. Being round they are easy to wash.
Cheap, clean, reliable & easily replaced parts. What could be better?
**************************
No comments:
Post a Comment